 Save
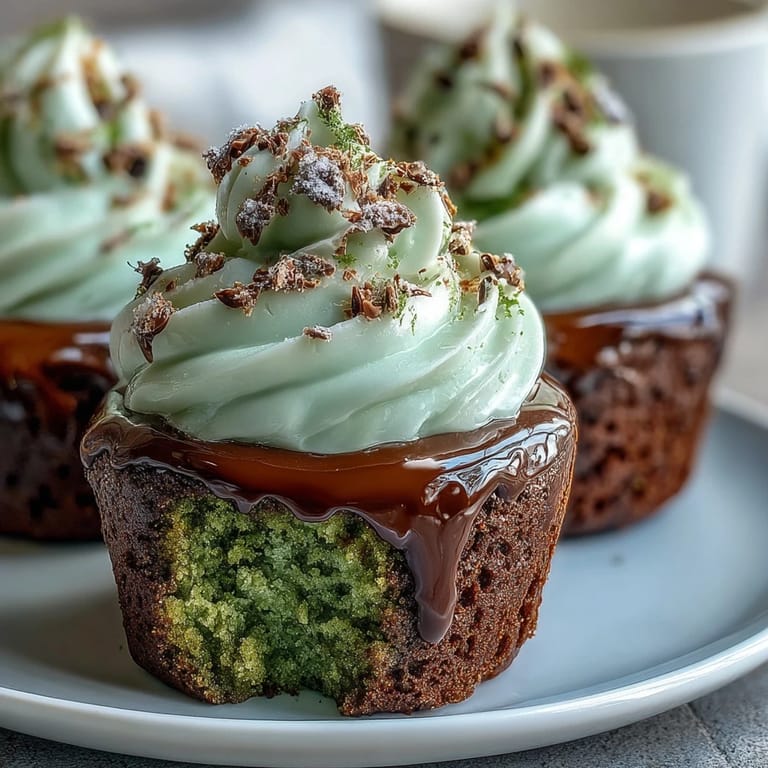
Save My neighbor showed up at my door with a box of these last March, and I couldn't believe how velvety and rich they tasted—nothing like the artificial green cake I'd feared. She laughed when I asked for the recipe, admitting she'd almost skipped making them because she thought green desserts sounded gimmicky. One bite changed my mind entirely, and now I bake them every St. Patrick's Day, watching guests do a double-take when they realize there's cocoa hidden in all that festive green.
I made these for a potluck at work one year, and someone actually gasped when they bit into one—not because they expected something terrible, but because the combination of subtle cocoa and tangy cream cheese was unexpectedly elegant. A coworker asked if they were chocolate or vanilla, and I loved that the green color alone hadn't prepared them for the actual flavor inside.
Ingredients
- All-purpose flour: The foundation of your crumb structure, so don't sift it unless your recipe calls for it—we're going for tender, not dense.
- Unsweetened cocoa powder: This is your secret ingredient that makes the green feel less artificial and adds an earthy complexity nobody expects.
- Baking soda: Works with the vinegar and sour cream to create that signature tender velvet crumb.
- Unsalted butter and granulated sugar: The creamed base should be light and fluffy, which means don't rush this step—it takes closer to 3 minutes if you're doing it by hand.
- Eggs and buttermilk: Room temperature ingredients mix more smoothly and create a silkier batter; cold eggs can seize the butter.
- Sour cream and vinegar: These create the tangy reaction that makes the crumb so delicate and tender.
- Green gel food coloring: Gel is thicker and won't thin your batter like liquid coloring would; start with 1 tablespoon and add more if you want an even deeper green.
- Cream cheese and butter for frosting: Both need to be softened, not melted, or your frosting will be greasy instead of fluffy.
- Powdered sugar: Sift it if you can; it dissolves faster and prevents lumps that feel gritty against your tongue.
Tired of Takeout? 🥡
Get 10 meals you can make faster than delivery arrives. Seriously.
One email. No spam. Unsubscribe anytime.
Instructions
- Set your stage:
- Preheat your oven to 350°F and line that muffin tin—this only takes a minute but makes everything smoother when the batter's ready to bake. If your kitchen runs cool, this is a good time to pull your eggs and buttermilk out of the fridge so they reach room temperature.
- Whisk your dry team together:
- In a medium bowl, whisk flour, cocoa powder, baking soda, and salt until they're evenly combined. This prevents lumps of cocoa from hiding in your finished cupcakes.
- Cream the butter and sugar:
- Beat softened butter and sugar in a large bowl for about 3 minutes until the mixture is pale, fluffy, and feels lighter when you stop the mixer. This step isn't just for texture—it incorporates tiny air bubbles that make your cupcakes rise beautifully.
- Introduce the eggs gently:
- Add eggs one at a time, beating well after each addition so each egg fully emulsifies into the butter mixture. If you dump them all in at once, the batter can look curdled and sad.
- Build your wet mixture:
- Stir in buttermilk, sour cream, vanilla extract, green food coloring, and vinegar until everything is combined and that gorgeous green color is evenly distributed. The batter might look slightly curdled from the vinegar and sour cream—this is exactly what should happen.
- Fold in the dry ingredients:
- Gently fold the dry mixture into the wet ingredients using a spatula, stirring just until you don't see streaks of flour anymore. Overmixing develops gluten and makes tough cupcakes, so stop as soon as everything comes together.
- Fill and bake:
- Divide batter evenly among cupcake liners, filling each about two-thirds full—they'll rise nicely without overflowing. Bake for 16 to 18 minutes, and they're done when a toothpick inserted into the center comes out clean or with just a few moist crumbs.
- Cool with patience:
- Let them rest in the pan for 5 minutes so they firm up slightly, then transfer to a wire rack to cool completely before frosting. Frosting warm cupcakes will melt the frosting and make your finish look messy.
- Make the frosting:
- Beat softened cream cheese and butter together until they're smooth and creamy, then gradually add powdered sugar, vanilla, and salt while beating continuously. This should take about 2 minutes and result in frosting that's fluffy enough to pipe.
- Frost with confidence:
- Once cupcakes are completely cool, pipe or spread cream cheese frosting generously onto each one. If you're using a piping bag, a simple swirl looks more elegant than it has any right to.
 Save
Save There's something magical about bringing a tray of these to a gathering and watching people's faces when they taste the cocoa undertone under all that festive green. My friend's daughter once asked if they were magic, and honestly, the way cream cheese frosting and subtle cocoa play together kind of feels like it is.
The Science Behind the Softness
What makes these cupcakes velvet isn't really a mystery—it's chemistry. The combination of sour cream and vinegar creates an acidic environment that tenderizes the crumb, while the cocoa powder adds minimal bitterness and a depth of flavor that makes the green feel intentional rather than artificial. I used to think velvet cake was just a name until I understood that the acid-to-liquid ratio and the cocoa are doing all the heavy lifting.
When to Add Your Own Twist
The base recipe is beautiful on its own, but I've played with variations that kept the character intact. A drop of mint extract adds a fresh brightness that feels very St. Patrick's Day without overpowering the cocoa, and some bakers swear by adding a touch of almond extract for an extra layer of complexity. If you want to experiment, start small—a quarter teaspoon of anything new is enough to test the waters without ruining a batch.
Frosting and Decoration Ideas
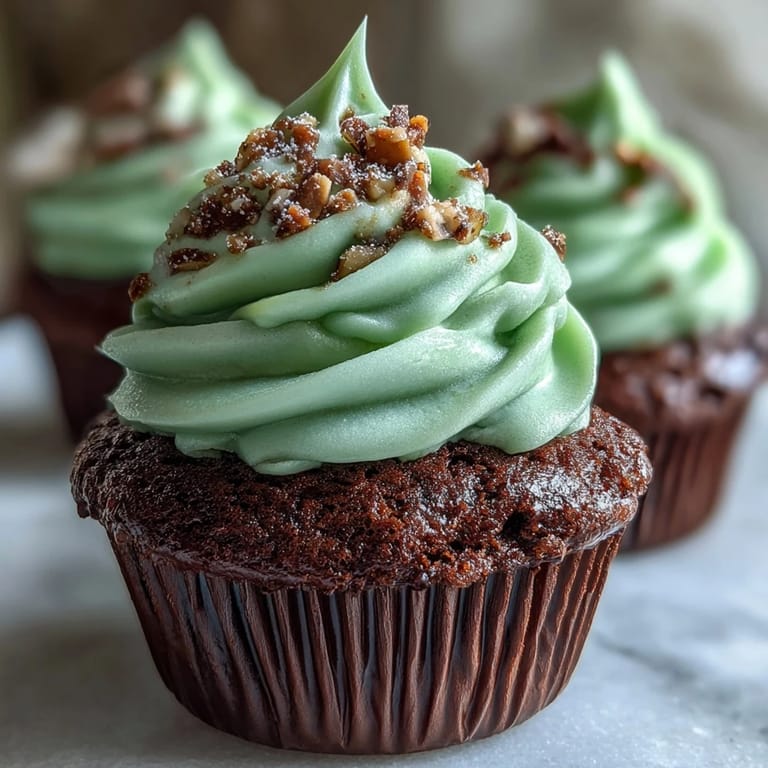
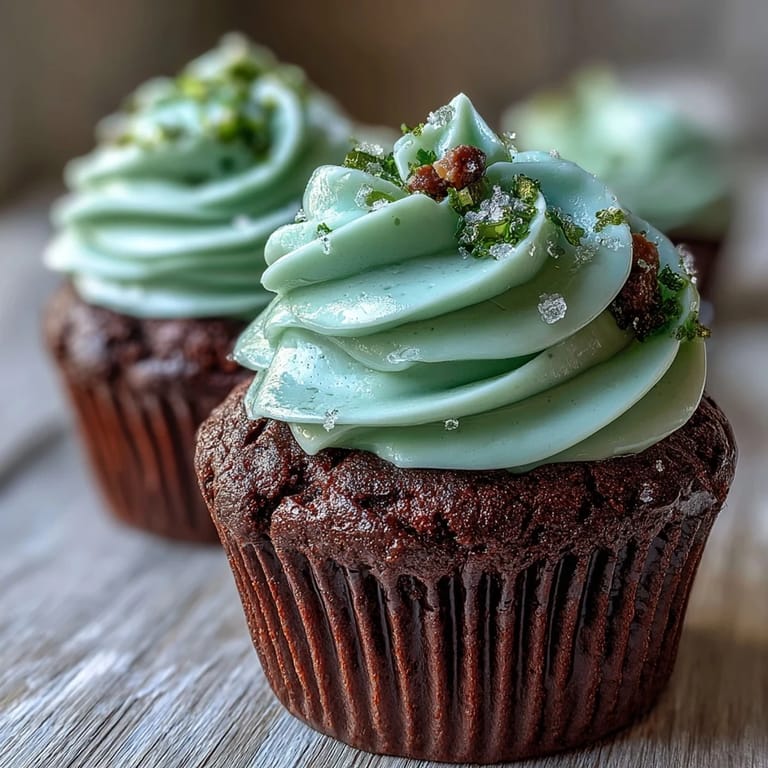
The cream cheese frosting is rich enough that you don't need to overdo decorations, but green sprinkles, a tiny gold coin, or even a dusting of edible gold leaf transforms these from homemade to showstopping. I've also piped a little extra frosting swirl and added it to the top of each cupcake before serving, which makes them feel fancy without requiring any special skills.
- Pipe frosting with a star tip for texture that catches the light beautifully.
- Add green sprinkles right after frosting while it's still tacky so they stick without sliding off.
- A single shamrock pick on top adds festive flair without much effort.
 Save
Save These green velvet cupcakes have become my favorite excuse to celebrate, even on regular Tuesdays when nobody's expecting it. They remind me that sometimes the best flavors come from embracing a little color and a whole lot of care.
Recipe FAQs
- → What gives green velvet its vibrant color?
Gel green food coloring is preferred for a deep, even green shade without altering the batter's texture.
- → How does buttermilk affect the cupcakes?
Buttermilk adds tenderness and a slight tang, helping to create a moist and fluffy crumb.
- → Can I substitute sour cream in the batter?
Yes, sour cream adds richness and moisture; Greek yogurt can be a suitable alternative though it may slightly change texture.
- → What is the best way to frost these cupcakes?
Use a piping bag or spatula to spread smooth cream cheese frosting evenly once cupcakes are completely cooled.
- → How should I store leftover cupcakes?
Store in an airtight container in the refrigerator for up to 3 days to maintain freshness and frosting texture.